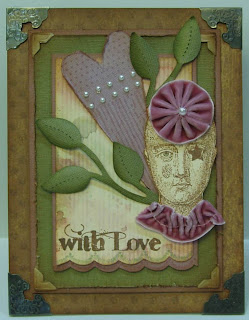
On the EWV Yahoo group a challenge was issued to find a piece of Wendy's art from her newest book or a blog entry from this year and let it inspire you to create something of your own. Well, my book hasn't arrived so I scrolled through her blog looking for that certain something that would call my name. I thought I found it but then I didn't. I think I ended up using several that got my creative juices flowing - finally. One of those entries was from 2/11. I love the scalloped stitching on the bottom of the tag, 'with love' and the heart. So, here's my rendition using what I know of Wendy.
The Maya Road ribbon and yo-yo are a perfect match to Victorian Velvet DI. I found the Bazzill paper (2 colors went well with VV and the green worked well with Bundled Sage and Forest Moss). I already had the Sizzix leafy vines cut out (sorry, Wendy!). I shaded the edges with BS and FM and curled the leaves for dimension. VV on the heart, distressed the edges then added Tea Dye to the edges for aging. Hero Arts pearls are on top.
The art chick was stamped on another tag with Coffee Archival ink. A bit of Vintage Photo DI frames her face. I don't have small Fantastix sticks for coloring so I took a fine (dry) paint brush and lightly touched it to the BS pad to color her eye. I don't normally wear lipstick so I find adding it to faces hard for me to do. I have lots of ideas as to where this lady is going from here. I see some career and holiday options - kind of like all the Barbies.
I inked Wendy's stripes with white, heat set. The tag was smushed into BS, VV and TD that was on my craft sheet, lightly spritzed with Heirloom Gold PP & water. Keep it up until you find the look you want. Love this easy way to make your background!
Several layers of Bazzil, aged and distressed, are on top of the brown polka dot layer. Kraft photo corners were also aged, Tim's Idea-ology corner frames finish off the piece. All this was mounted on chipboard for sturdiness. I even created an easel leg so it could stand up as if in a proper frame. Don't know if you can tell but I added some shims between the corner frames and the base layer to add more depth. Some of the layers and elements have foam tape behind them for elevation.
Another long-winded explanation. Sigh.


Great take on Wendy's new stuff.
ReplyDeleteLong winded, perhaps, but I like it when people give detail on how they created the piece! This turned out absolutely fantastic, Susan, I love the collar and flower on art chick! The background colors are awesome!
ReplyDeleteIt's wonderful, Susan!!! And I appreciate your long winded explanation!!!!
ReplyDeleteI remember that tag, I almost CASEd it myself! I love your interpretation.
ReplyDelete