Wednesday, March 31, 2010

I wish...


that this project hadn't taken as long as it did! I had the idea for days but then couldn't decide on a color. Then I had too many flowers, leaves, etc. but couldn't figure out what to keep and what to save for another project. Changed out the inside piece colors, background stamps and sentiment everal times. Went vertical instead of horizontal. For a 3"x4" piece this took way too long to come together - IMHO.

The ivory moire place card frames I found on clearance in the bridal section at Michaels. The inside oval ring? It fit PERFECTLY as is...from an old box of 1700+ shapes by Nicole Crafts I got years ago at A.C. Moore. But I did change it from bright blue to blue-green by adding brown distress ink over it.

All the stamps are Wendy Vecchi's, the Elegant Flourish (used only part of the larger one) and the Tattered Flowers (2 smaller sizes) are Tim Holtz Alterations by Sizzix. The corner frame is Tim's from the Idea-ology line. All inks by Ranger (who else??) The fern punch is Martha's, the shiny buttons all started out clear (flower center, 3 flat leaves). I cut off their shanks and colored them with alcohol inks.

See that larger flower in the lower left corner? If you cut it up like the Tim/Wendy rose you get the middle flower on the bottom. You can stack the left and middle flowers (bottom) and get a really full rose. Unfortunately that one overpowered the piece. I know I have an even number of flowers - a decorating no-no but I think it's okay on this project. Not really noticeable from a design standpoint. All in all it turned out to be a rather decent project IMO.

Monday, March 29, 2010

Embossable You


Finally got a chance just to play in my stamp room! Made some artsy stuff but I can't show that to you yet. But here's something fun I did.

There's been plenty of talk of people creating their own embossing folders. But what do you call it if it's not a folder? I glued down some cardstock shapes (I purchased a very long time ago) onto a piece of cardstock. I chose to make my samples (multi-colored pieces) A2 size so I could completely fill a cardfront with my chosen design. On the sample I did lightly rub an ink pad over the embossed parts so you could see how they turned out. Cool, huh?

Just think of all the designs you can create with the punches you have on hand. But I have one warning to issue. You must make sure there is NO adhesive (or anything else you don't want embossed) showing because it WILL show up when you emboss. I did try chipboard letters but in the Wizard it kept tearing the paper. I think I'll try it without a 2nd hard pad (white or blue) to see if I can still achieve the look I'm wanting. I'm thinking a person's name embossed on a card would be cool!

You don't have to get inky to make art!

Wednesday, March 24, 2010

Distressed watercolors


I love Ranger's Distress Inks so much that I even watercolor with them. The image is stamped with Ranger Archival Black ink onto watercolor paper. It's easy to use the ink pads for watercoloring. I just smush a corner of the pad onto my craft sheet and use a wet paint brush (or water brush) to apply the colors. The image and blue layer were cut from a Spellbinders die. Subtle texture is added to the far right side with a Cuttlebug border embossing folder; the straight border line I created on my Scor-It. The rabbit's tail looks flat but I don't have anything dimensional on hand. Whatever I do I'll have to do times 18 because that's how many I made. The computer-generated sentiment is 'You...turn my world upside down!' Happy spring!

Friday, March 19, 2010

Inspired by the book


I'm really enjoying Tim Holtz' new book 'Compendium of Curiosities'. I didn't think I needed it since I can access his Ranger videos and have the tutorials for all his Christmas tags. However, the book also has info on all his Idea-ology products and how he goes about making a project. I certainly didn't need another 'here, make my project' book. The photos are truly awesome! I've even caught myself seeing if a clamp or pin is real or part of the photo. The book lays flat, the info is concise and written so a newbie or an advanced artist can follow and learn.

I was sitting at my desk poring over the book (again) trying to decide which tutorial to try first. The water stamping one caught my eye since it was completely new to me. I used Tim's flourish for the background water stamping and overstamped with his child and dog stamp. Even though the sentiment isn't Tim's it certainly fits this stamp. I'm always needing a card like this; don't always need it to be a get well card. This works perfectly for my needs. Since the back of my tag was so messy with distress inks I adhered the tag to coordinating cardstock so I could write my message.

Fun, simple and to the point!

Thursday, March 18, 2010

With love - blog inspiration


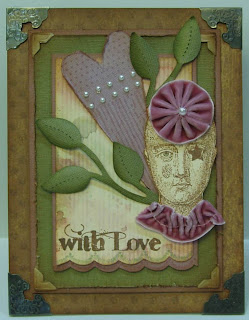
On the EWV Yahoo group a challenge was issued to find a piece of Wendy's art from her newest book or a blog entry from this year and let it inspire you to create something of your own. Well, my book hasn't arrived so I scrolled through her blog looking for that certain something that would call my name. I thought I found it but then I didn't. I think I ended up using several that got my creative juices flowing - finally. One of those entries was from 2/11. I love the scalloped stitching on the bottom of the tag, 'with love' and the heart. So, here's my rendition using what I know of Wendy.

The Maya Road ribbon and yo-yo are a perfect match to Victorian Velvet DI. I found the Bazzill paper (2 colors went well with VV and the green worked well with Bundled Sage and Forest Moss). I already had the Sizzix leafy vines cut out (sorry, Wendy!). I shaded the edges with BS and FM and curled the leaves for dimension. VV on the heart, distressed the edges then added Tea Dye to the edges for aging. Hero Arts pearls are on top.

The art chick was stamped on another tag with Coffee Archival ink. A bit of Vintage Photo DI frames her face. I don't have small Fantastix sticks for coloring so I took a fine (dry) paint brush and lightly touched it to the BS pad to color her eye. I don't normally wear lipstick so I find adding it to faces hard for me to do. I have lots of ideas as to where this lady is going from here. I see some career and holiday options - kind of like all the Barbies.

I inked Wendy's stripes with white, heat set. The tag was smushed into BS, VV and TD that was on my craft sheet, lightly spritzed with Heirloom Gold PP & water. Keep it up until you find the look you want. Love this easy way to make your background!

Several layers of Bazzil, aged and distressed, are on top of the brown polka dot layer. Kraft photo corners were also aged, Tim's Idea-ology corner frames finish off the piece. All this was mounted on chipboard for sturdiness. I even created an easel leg so it could stand up as if in a proper frame. Don't know if you can tell but I added some shims between the corner frames and the base layer to add more depth. Some of the layers and elements have foam tape behind them for elevation.

Another long-winded explanation. Sigh.

Wednesday, March 17, 2010

Happy St. Patrick's Day!


You don't have to be Irish to celebrate the wearing of the green. After all, you celebrate Halloween and you're not a pumpkin. (Sigh) I can't take any credit for that line; I saw it on the Gingerwood Bulletin Board a few weeks ago.

Whipped this card up yesterday-nothing like the last minute. The white layer features the Wisped Frames technique from the latest Technique Junkies newlsetter. The dancers and sentiment are by Art Impressions. The green layer has one of Wendy's new background stamps (love that plaid!) stamped in gold. A few brads and gold photo corners and I'm done...and satisfied with the square (a first for me!) card.

I've donned my green and am awaiting the smells of my corned beef to waft back to my stamp room. Can't wait for dinner!!!

Saturday, March 13, 2010

Thespian flowers


I don't like to give flowers to thespians as they are standing in receiving lines after a performance. Where do they put them or how can they hold them while accepting words of praise, hugs, etc.? And they don't last long once they're home, providing they make it home, etc.

One of my nieces is performing the role of 'Ursula' in 'Bye, Bye Birdie' this weekend and she's also the student director. Great performance last night to a full house! There's another show tonight and a matinee tomorrow.

The flowers and 3" circle - chipboard; gears - Sizzix Sizzlits die; leaf punch - Martha Stewart; fragment - Tim Holtz; sentiment - Another Stamp Company; background stamps (flowers and circle) - Wendy Vecchi. Glossy Accents (Ranger) cover the flowers. All inks - Ranger.

Monday, March 8, 2010

fe, fi, FAUX, fum


This faux card is maxed out! Faux leather, faux tortoise shell, faux rust, faux fabric and faux wear & tear...compliments of Ranger (distress & alcohol inks, acrylic dabbers; distress embossing powder), stamps by Tim Holtz and Wendy Vecchi, a Fiskars leather embossing folder, Tim Holtz sanding block and a Tim Holtz copper D-ring by Junkitz (no longer in business). 'Art' chipboard letters (mixed fonts) are from Maya Road.

Sunday, March 7, 2010

Some days...


Some days you just have to be ornery. Actually, this is for an ATC swap with the theme of being a smart aleck. I wasn't going to participate but found the sentiment stamp on clearance not too long ago. (Don't you find yourself buying a stamp here & there *just because* then later thinking to yourself, 'Why?') At the time I thought it would be perfect for 'The Thinker' statue. Never dreamed I'd be able to use it until someone was having a particularly crummy day. Hey, can you see the poo?

Speaking of 'just because' stamps, any one else own a tiny electrical plug? How about a roll of toilet tissue...with an extra piece of a single tissue???

Think I'll use the tissues to wipe away some rain drops from my window today.

Saturday, March 6, 2010

A smattering of sample colors


Whenever I get new inks I like to get the cases labeled on their sides so I can find them easier when they're in stacks. Then it's time to play with the colors to see what works and how. I'd saved a list of some nice distress ink color combos but had never taken the time to try them myself. I added in a few colors from the new release (just LOVE these colors!). Fortunately I wrote the colors on the back of the tags. I know I'll never be able to recreate the color exactly but I now have more ideas in my head for combos I might not have tried otherwise.

When you find yourself at a loss in the state of creativity, pull out some inks and just play! You never know what will come of it.

Friday, March 5, 2010

New stamps, new card


Finally got a chance to play with my new Wendy stamps. They are all so cool and complement the earlier sets. I'm so in love with her images I've been seriously considering selling off much of my 15 year collection - gasp!

I was looking for something in one of my stashed storage bins (my own little store!) and ran across some coffee filters. I'd made a baby book a long time ago with them but nothing since. Hmmmm...let's take them out and play with them. I tried some faux batiking on them but wasn't really keen on my results. The washes needed to be a lot darker for the image to appear but then it became too difficult to stamp a darker image on top. We'll try that again another day.

Using Ranger Archival Inks I stamped the images on the filter. I added distress stickles to the green leaves and regular stickles to the flourishes. A black gem for the bird's eye, a button tied with hemp and I'm happy! But now I needed a card to go in the 'envelope'. More new stamps, a few flourishes, distress ink around the edges - cool. Both items still needed something else...aha, black glaze pen to the rescue! Went all around both pieces to finish off the look I was wanting.

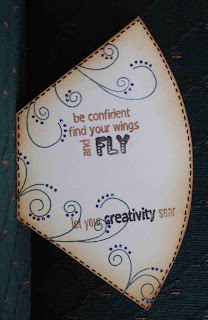
Hope you can let your creativity soar today!

Monday, March 1, 2010

Mini art fat book - all the rage!


Just took another class with Wendy Vecchi at Scrapbook Friend'z in Bloomington, IL. I got to meet up with 2 others from the EWV group - always fun to meet like-minded folks in your groups! Lori and I had met before but Debby was 'new' to us. She knew who I was because I was wearing my Funky Flower Art (Wendy's stamps) sweatshirt*.

I got there early so I could put out place cards so no one would take our seats cuz we wanted to make sure we sat together. Wendy demo'd the hour prior to the class...pigment ink, mini misters, Perfect Pearls, new stamps, etc. Getting there early meant a chance to shop - and did I shop! Got some new Tim Holtz stamps, more Ranger Archival ink pads and re-inkers, Maya Road goodies and much, much more.

We spent 4 hours coloring Maya Road chipboard elements, cutting out and coloring grungeboard & paper images (that Wendy's husband stamped for us!) and adhering them all to Maya Road's Mini Scroll Layer Book. Our class was the first to use Wendy's newest stamps and the new distress ink colors. Yum yum! You can see how fat my book is; I used grungepaper scraps to lift the various elements on the pages. I prefer it to pop dots or foam tape because I can make the elevations more subtle.

If you've ever taken Wendy's classes you know she gives fab door prizes. I was one of the lucky winners and got a Maya Road House Album and a little suitcase of mini houses. We all got Maya Road keychains with the words 'art, read, create, simplify and imagine'. How cool is that!??!?!

Don't know about you but my eyes keep going all funny when I read the entry title today - I see 'fart book'. Oops - think I better drink some more coffee!

* I've been asked to teach a class on making this sweatshirt or making them to sell. Having been in the 'handcrafted items for sale' business once before I don't think it would be worth my while. Then again, maybe it would. Hmmmm...

Off to play with my new toys!