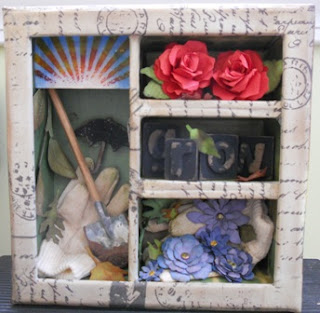
I did finish the outsides of my inner box so it can be displayed with or without the cover. I found it easier to make a template for my inner boxes before ruining good paper. Not all boxes are created equal!
 | ||||||||||||||||
| From the front |
I chose the 5.5"x5.5" configurations box and removed 2 of them. The shovel and gloves have been sitting in a drawer just waiting to be used in a project. The gloves were inked with green & brown distress inks. The shovel's handle was sanded and stained (more brown distress ink). I mixed up some modeling paste and brown paint and dipped the shovel into it...once dry it works as dirt!
From Psychedelic Grunge I stamped the rays in yellow, orange and red archival inks onto shrink plastic. Once shrunk I dabbed blue archival ink on the back to represent the sunshine needed to garden. The grungeboard umbrella is from the Iconic Grungeboard collection. You need rain to garden...wish we'd get some; we're so, so dry!
The roses were cut from mulberry paper using Tim's Tattered Pinecone Die. It makes excellent roses! I used the Tattered Flower Garland and Autumn Gatherings dies for the leaves and flowers (used up lots of scraps). All were treated to various distress inks. The Sizzix Leafy Branch die is on the left hand side of the larger opening. It reminds me of the morning glories that grow wild and strangle my flowers and bushes.
 |
| another front view |
Paper from Tim's Lost & Found Stash covers the outside of the box (also my color inspiration) and paper from Retro Grunge (green pages) was chosen for the insides of the boxes. Brown archival ink was wiped over all the tissue tape and papers to make them look aged.
 | ||||
| side view |
Tip: burnish, burnish, burnish the tissue tape with a bone folder will make it lie flat and smooth. A bit of Matte Medium or Glue 'N Seal will hold down any unruly bits that just don't want to play nice.
I'll also be sharing this project on Maya Road's Facebook page. Each month during the summer (starting with July) you can enter a project and it will be entered into a random drawing for a Maya Road prize package valued at $20. Maya Road products work well with Tim's papers, inks, stamps and techniques.
Happy gardening!


Susan, this is gorgeous! Love your garden theme - hope you get some rain soon - you could have some of ours, we have had loads and loads here in England!!
ReplyDeleteAaaw this is so pretty very nice little garden love the roses ;)
ReplyDeleteSpectacular piece Susan! Love the garden theme, works great for a config box!!!
ReplyDeleteOnce again, I am awed by your creativity! What a fun piece!
ReplyDeleteI love it. Such a perfect theme for this time of year. I cannot get enough of gardens and flowers.
ReplyDeleteSwooning over that shovel....too stinking cute! I love seeing a garden theme...so clever...and the paper is perfect! Great flowers! This is so inspirational Susan!!!
ReplyDeleteWhat a great theme! Love how you used the rays, and I agree... where is the rain?!?!
ReplyDeleteI do love your roses but they seem so small. How you manage that I will never know! I tried the pine cones once, they drove me nuts!
ReplyDelete