Recently Karen Cheetham taught a class at Absolutely Everything featuring her Chunky Tag Shadow Boxes. Sure wish I could have been there...they looked smashing! And you're not limited to a tag, either, as she's used Tim's large pumpkin and gingerbread man. I did see
photos of a wintry box, Halloween, and stacked flower pots as well as butterflies and another with a chocolate bunny for Easter. I'm thinking that Tim's large rabbit die would be super cute with a hole in his tummy showing carrots or jelly beans.
Karen has just shared her instructions with the
AllThingsTim Yahoo group so I just couldn't wait to try this myself. After making a mock up I decided to make my tag shadow box without using the foam strips but created a box to fit behind the front tag. I cut a 2nd tag with the same opening so it fits around the shadow box giving it a completely finished look from the back. I also used Tim's small easel die to create a stand for displaying it on a shelf.
Several ideas are forming in my head for the other seasons...and sounds like our weather forecast will give me plenty of time to work on them.
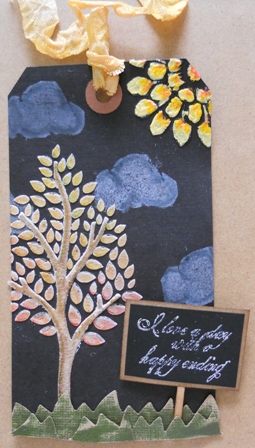
Here are some of the items I used to create my version.
Martha Stewart: ribbon, mini hydrangea, rabbit, fern leaf, butterfly punches
Tim Holtz: Lost & Found stamp set (birds), rabbit die, Tattered Banners die, Auturmn Gatherings die, Tag & Bookplate die, small easel die and the cobblestone die (made my own stencil)
Ranger: distress inks, Rock Candy Distress Stickles, Jet Black Archival Ink
Claudine Hellmuth: acrylic paint
core'dinations: kraft core and color core
Studio 490: embossing paste
Miscellaneous: moss, oval hand punch, square toothpick
Quite a few people (my good friend, Candy, included) have been using Wendy's brick wall stencil as partial fades and I love that look. This got me to thinking about it's use here but it really was too big for this piece as the sides and bottom are only 1/2" wide/deep. I bought the cobblestone die not realizing how many little cobbles there were and that they don't stay put without help. Argh. So I wondered if I could turn it into a stencil. The strip dies don't really cut anything beyond lightweight paper but I had a backing sheet from labels and cut it....like buttah! Because the one side is a non-stick surface this was just perfect for a stencil.
If you have any questions, please ask.
Once my neighbor sees this I have a feeling I'll be making another one very soon. lol


.jpg)
.jpg)
.jpg)
.jpg)
.jpg)
.jpg)
.jpg)
.jpg)
.jpg)


orama+-+front+view.jpg)
orama+-+back+view.jpg)


