Showing posts with label core'dinations. Show all posts

Monday, February 13, 2017

Love

Stampers Anonymous: Blueprints 2

white cardstock, core'dinations red cardstock, off-white cardstock

Sizzix: Stitched Ovals, bow punch, Love Print texture fade

Gold ribbon, gold vellum

Ranger:  clear embossing ink, Antiquities Chinese Red embossing powder

ColorBox gold pigment ink

Saturday, December 10, 2016

What December brings

A silent night, bells ringing o'er the land, peace on earth, the spirit of Christmas.

Here's my December version of Tim Holtz's 12 Tags of 2016.

Base ingredients:  #8 tag, textile surfaces (linen), paper stash (Yuletide), chipboard, core'dinations (Kraft Core, Adirondack), gold vellum, shrink plastic

Ranger:  distress ink (Gathered Twigs, Scattered Straw); gold Paint Dabber; distress embossing ink; Ultra Fine Detail gold embossing powder; distress paint (Picket Fence, Candied Apple); archival ink (Potting Soil)

embellishments:  flashcards (Holiday); rub-ons (Christmastime); token

Sizzix:  stencil (Holiday Script); mini movers & shapers (bell, star); punches (660171, 660163), thinlits (Holiday Greens, Mini); shadowpress (Months)

Will the illustrious Mr. Holtz continue with the 12 tags for next year or does he have something else planned?  Only time will tell but it has been fun, if not challenging at times, to recreate his tags using products on hand, revisiting older products, and trying out new ones.

(original size)


Tuesday, August 16, 2016

Happy anniversary to dear friends

They love going to the Jersey shore to celebrate so this card is perfect for the occasion.


The image was stamped in Jet Black archival ink onto watercolor cardstock and colored with distress markers.  I used a corner round punch to change up my normal rectangular look of layers.  Blue (Adirondack) core'dinations cardstock was run through the waves embossing folder and sanded lightly before being adhered to a white A2 card.

I cut up strips of sandpaper to add to the beachy feel...you gotta have sand if you're at the shore!

From peach Bazzill cardstock I die cut 'together'.  The green sprigs are leftover punches from a previous project.  The crab was stamped onto watercolor cardstock in JBAI and also colored with distress markers.

Sizzix texture fade/Waves; Thinlits/Celebration Words: script; Thinlits/Friendship words: script

Ranger:  Jet Black Archival Ink, distress markers

Cardstock: Core'dinations, Bazzill

Stampers Anonymous cling stamps: Mariner, Nautical

I don't know why this post showed up early as it was marked for 8/16.  Oh well, guess I should be happy that it showed up at all given the computer issues and power outages we've been having.


Monday, August 1, 2016

With deepest sympathy

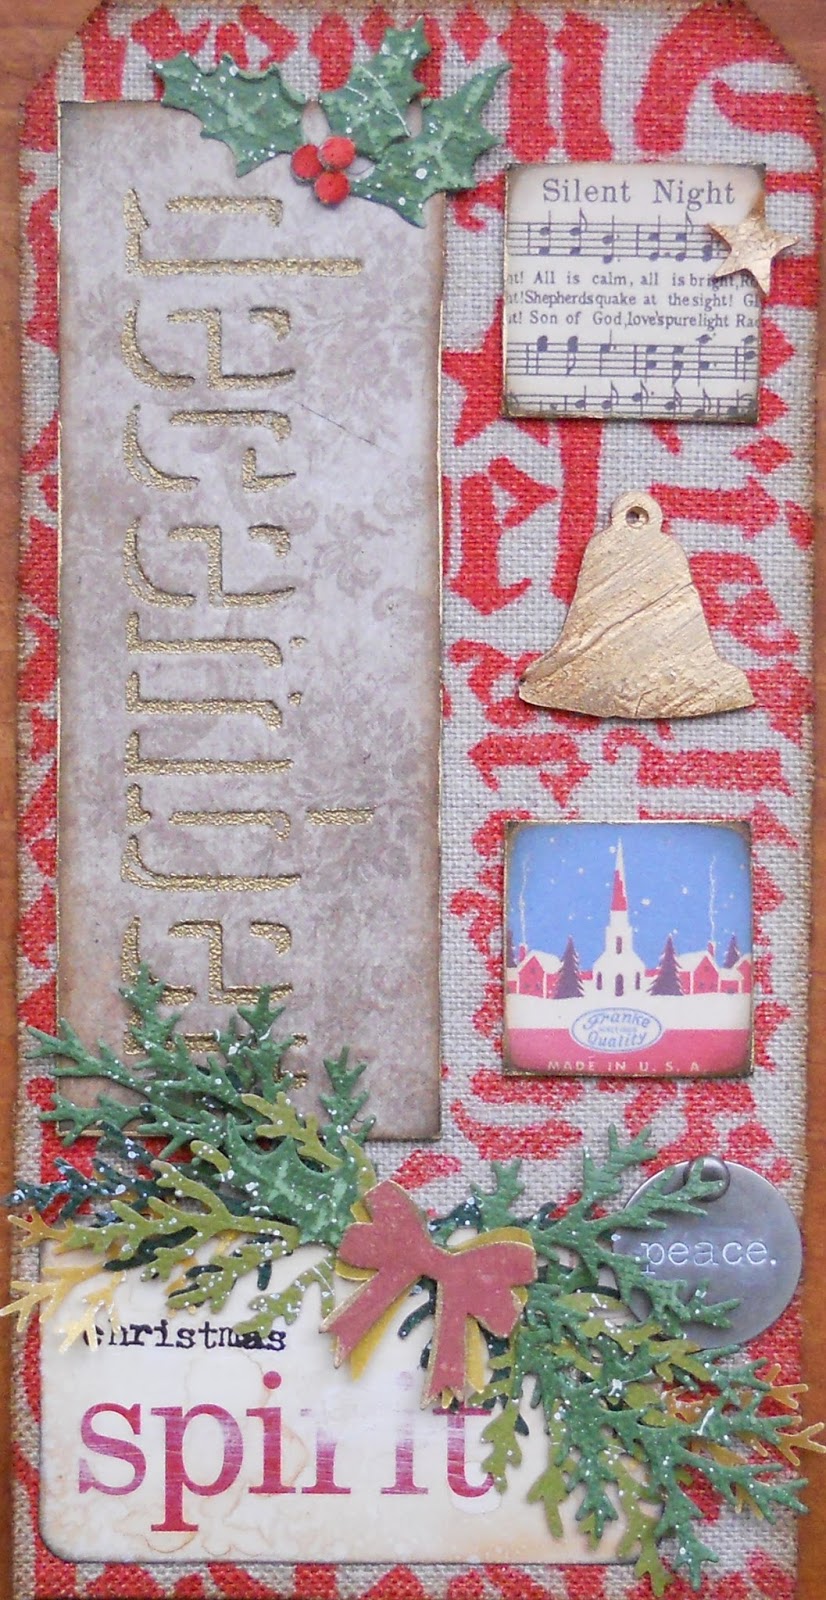
A2 white cardstock base

core'dinations Adirondack collection (brown cardstock) run through We R Memory Keepers 'Woven' embossing folder

Sizzix Wildflowers Thinlits dies 661190; bow punch (colored with distress inks...whatever was on the foam applicator)

Hero Arts sentiment C2727 inked with Jet Black archival ink

I recently got this 6"x6" embossing folder and was anxious to test drive it.  Adding a bouquet of flowers seemed the perfect add-on.  I did find it thicker than other folders so I had to use a Premium Crease Pad instead of one of the acrylic plates in my Big Shot Plus.

Friday, April 15, 2016

Make a wish

Across the bottom of a sheet of mixed media cardstock I smooshed some green distress inks, misted, let run/pool, heat set.  On the opposite end I did the same but used blue distress inks.  Over this I placed Wendy Vecchi's new Picket Fence stencil (the large one) and added brown distress ink until I was satisfied.  Using Tim's Woodgrain background stamp I inked it up with a darker brown distress ink and with the stencil still in place I pushed it into the openings, creating a fence that looked more realistic.

From the Adirondack core'dination cardstock collection I cut a number of wildflowers (Tim's) and sanded the edges...very carefully as these are quite fragile.  The watering can (also Tim's) was cut from the same collection of core'dination and sanded.  Another watering can was cut from thin chipboard so it would be more dimensional. 

The message was stamped in JBAI before adding the wildflowers and watering can.  The card front was adhered to a half sheet of Bazzill card stock (peach in color).

Monday, February 1, 2016

Taking time to say hello

White cardstock base; core'dinations layer; Watering Can archival ink; stamp from Simon Says Stamp/Tim Holtz 'Stamptember 2015''; self-adhesive gemstones painted with Worn Lipstick distress paint

A simple card to let others know I'm thinking of them.  Not everyone likes the distressed or grungy look so it's nice to change up my look and go for a cleaner, neater appearance.

Saturday, January 2, 2016

January birthdays

white cardstock
core'dinations blue cardstock
Ranger:  snow cap pigment ink, embossing ink
Stampendous: winter wonderland embossing powder
Stampers Anonymous: Handwritten Thoughts
Sizzix:  Layering stencil (Snowflakes), Snowman, mini movers & shapers bow

White card base, blue layer dry embossed with the snowman folder then sanded.  White pigment ink used with the layering stencil.  Cover box with white pigment ink, dry.  Pressinto embossing ink and add sparkling embossing powder, heat set.  Drop of glue behind the bow and place at the snowman's neck in lieu of a scarp.  Stamp message in embossing ink, sprinkle with glittery embossing powder, heat set.

Here in the midwest you're like'y to have a birthday sparkled by snow.  So as you walk through it, leave a bit of it (and yourself) behind.

Saturday, December 26, 2015

Holiday thank you

Here's the card I created to thank those who gave us gifts over the holidays.  I like to have them coordinate with my holiday cards.

Bazzill cardstocks (white, red)
Core'dinations cardstock (brown)
Sizzix Birch Trees embossing folder, mini movers & shapers cardinal
Stampers Anonymous 'thank you' stamp
Ranger Jet Black Archival Ink, Diamond Stickles

Monday, December 14, 2015

It takes a village

I wasn't going to fall in love with Tim Holtz's village dwelling.  I wasn't.  Too much money for me, I said.  Too limited in creativity, I said.  Boy, was I ever wrong!  I'll show you what I mean.

Brick house

School

Winter house

House of worship


I've tried to list everything I used but I didn't keep track of the colors of anything...I just kept grabbing and playing until I was satisfied.

Dies:  Village Dwelling, Village Bell Tower, Village Winter, Brick Wall, Cobblestone, cross
Ranger:  alcohol inks, archival inks, distress inks, distress paints, distress stains, distress markers, watercolor distress paper, Distress Stickles Clear Rock Candy Dry Glitter, Texture Paste
Extras: Frosted, Studio 490 Embossing Paste, clear packaging, mica, 110# cardstock, Kraft Core, Adirondack Core, bells, mini fasteners, wood toothpicks, shrink plastic, graphite pencil, Burlap Texture Fade

Brick house:  IRL the door isn't quite that yellow.  The lines were made with distress paint smeared on my craft sheet and a square wood toothpick placed in it then on the door to create the pattern.  Mini fastener = doorknob.  I created a stencil using the Brick Wall die and smeared embossing paste through it.  Let dry then added color.  The house was first painted with Hickory Smoke distress paint to simulate the mortar.  The front stoop was painted with HS dp then splattered with Black Soot d. stain (love that spatter brush!) to look like marble.  Mica is behind each window.  Wood toothpicks are the pillars.

School:  wood toothpicks around white sign.  Hand-wrote the name of the school.

House of worship:  shrink plastic and mini movers & shapers cross for the front door.  Used the Cobblestone die to create a stencil and smeared various d. inks through the stencil.  Randomly drew around some of the stones with the graphite pencil.  Upon completion I smeared a light brown d. ink all over the pieces (before construction!) to smudge the look.  The roof shingles were drawn with the graphite pencil then smudged with my fingertip.  Alcohol ink on clear packaging is behind the windows.

Winter house:  Frosted behind the windows;  Frosted for the snow and icicles - covered all with MultiMedium then sprinkled DS Clear Rock Candy dry glitter over all (did this post-construction).  Added Texture Paste and DSCRCDG to windows and stoop.  Mini fastener for door knob.

I still have plenty of ideas in my head and know that with the release of more dies next year I won't get bored creating a village...or two.  Maybe I'll make one for each season...time will tell!

Thursday, November 26, 2015

Happy Thanksgiving!

I'm grateful for all the support I've received over the years from my artistic friends.  Because of them this blog was created...and today is my 800th post!  It's been a fun journey thus far and I look forward to many, many more posts sharing my creativity with you.
The base is orange cardstock (unknown manufacturer) and the black/orange layer is Core'dinations Black Magic cardstock.  After sanding down the embossed portions (Sizzix Thankful background embossing folder) I went over them with a bit of brown distress ink to darken the orange.

From watercolor distress paper I die cut Sizzix Layered Leaf.  I smeared several distress inks on my nonstick craft sheet, misted the ink, then carefully placed my leaf into the ink and water drops.  I dried the piece then kept dipping it in the ink drops until I was satisfied with the color placement.  Love the coordinating texture fade...I smeared the inside with brown distress ink first before running it through my Big Shot Plus.  When it came out I misted it with a bit of water and dried it with a towel before hitting it with the heat gun.  The brown was a bit too strong for my liking.

Happy Thanksgiving!


Thursday, October 15, 2015

Together...forever

NOT your traditional anniversary card!  Every once in a while I get a wild hair and make something totally unexpected for my sister's anniversary.  She and her husband know to never guess what type of card I might send.  Good thing, huh?

Mini Halloween 2; Provocraft Heartblocks embossing folder; archival inks (Red Geranium, Jet Black, Watering Can); Love thinlits and Shape Strip thinlits; Bazzill cardstock; core'dinations cardstock; heart stamp (Good Stamps Stamp Goods); MultiMedium

Tuesday, September 1, 2015

At the movies

Happy birthday to my youngest niece!  She's currently enrolled as a freshman at SIU Carbondale and hopes to major in film production.  Thought these Stampsmith stamps of veteran movie stars was perfect.  Add some filmstrip ribbon and a Sizzix camera die and it was perfect!

For the background I copied info about the 3 Hollywood legends (Clark Gable, Louise Brooks and Shirley Temple) from Wikipedia and printed it out on white cardstock.  The images were stamped in Adirondack ink on vellum; I think I like the look better than the suggested archival/permanent ink on glossy paper. 

Wednesday, July 29, 2015

Revolvers and Pistolas...

A very good friend has penned a new book, 'Revolvers and Pistolas, Vaqueros and Caballeros'.  While it's a fairly dry read for me (I usually read murder mysteries), I did learn quite a bit about the debunking of the Old West and Mexico's role in establishing the United States as we know it. 

One interesting fact I uncovered was that the writer of the Zorro stories was from Illinois; Chillicothe and Ottawa, to be exact.  Both are within a 2 hour drive from me.  Who knew????  I certainly didn't.  I wonder if either town shares the knowledge with its residents?

I wanted to send the author my congrats on the book and let him know of the valuable lessons I learned.  Here's the card I sent.
The woodgrain embossing folder (brown Core'dinations cardstock) is from Tim Holtz's collection of designs.  The stamp in the lower left corner is by Stampin' Up (brown and black distress inks); the upper right one is by Sunday International (Jet Black Archival Ink, distress markers on watercolor paper).  I've had some gun brads in my embellishments drawer for ages; not many occasions arise for them but felt this was the perfect one.  A bit of brown twine was twisted to resemble a lariat.

Have you read a good book lately that made you think differently, or opened your eyes, about a subject?

Thursday, July 16, 2015

Celebrate summer

 
by taking a trip to the water's edge with me.
 
Stampers Anonymous Mariner stamp set; Sizzix (Waves Texture Fade, Celebrations Words: Script, mini bottle); Sarasota Stamps (sand); Copic Marker E31; Ranger (Jet Black Archival Ink, Pumice Stone, Abandoned Coral, Fossilized Amber distress inks, watercolor paper; Core-dinations blue, gray cardstock; plastic packaging 


Saturday, February 7, 2015

Let it snow!

The snow was falling heavily the day I created this tag.  While we didn't get the right snow to make a snowman, I did create a papery one with plenty of texture.

#8 tag; Stampers Anonymous CMS098 Grunge Flakes; core'dinations whitewash collection; distress stains (Tumbled Glass, Picket Fence, Weathered Wood); distress inks Tumbled Glass, Tea Dye); archival inks (Jet Black, Tree Branch, Monarch Orange); Rock Candy Distress Glitter; Texture Paste; Sticky Embossing Powder; Sizzix dies (Winter Wonder, Typeset, Alphanumeric); chipboard; foam tape; clear snowflake; jump ring; crinkle ribbon
Here's a close-up...the technique is on the snowflakes.  It's kind of difficult to see in the photo above.

This tag has been entered into the CCC3 #21 Challenge...see page 55 of Tim's latest book for details on how to create this look for yourself.  Don't forget that you have two chances of being a winner...one is chosen by the Curiosity Crew and gets an awesome package of Tim's products while the other is chosen randomly and gets a $50 gift certificate to The Inspiration Emporium.  How can you go wrong?  Happy creating!

Wednesday, January 21, 2015

Wishes

Here's my entry for the 20th challenge from the CCC#3.  You can find the instructions on page 40 of Tim's book.  I chose a very subtle look using the technique (on the 3 larger words) but in person the effect is much more dramatic.  The visual dimension it creates is awesome!  Don't forget to check out the samples shared by the Curiosity Crew and to comment on each one....that's part of the rules!

Ranger:  Pumice Stone distress marker; Jet Black, Red Geranium, Tree Branch, Venetian Orange, Saffron archival inks; Red Geranium, Tree Branch embossing powders

Stampers Anonymous: Good Thoughts stamp CMS085; Burlap, Hearts stencils

Studio 490:  black embossing paste

Sizzix:  Love Print texture fade

Core'dinations:  red kraft core

Misc.: silk ribbon, water color paper, black card stock

On the black card base I used the black embossing paste and hearts stencil; removed the stencil and pinched out the Red Geranium and Tree Branch embossing powders.  Let dry; heat set.  Love the colors together!

Don't forget that you could be chosen as the Curiosity Crew's choice to win a wonderful assortment of goodies from Tim and Mario or you might be the random winner of a $25 gift certificate from this week's sponsor,  The Funkie Junkie!

Wednesday, December 24, 2014

Candlelight trio

These are much safer than real candles!  The entire display is approximately 9" across by 3 1/2" high.  I do have a small cardboard rectangular block behind the candles to allow them to stand upright.

Grungeboard, kraft core core'dinations, distress paints (antique linen, scattered straw, wild honey), brown distress ink, Sizzix dies (distressed doily, tattered pinecone, candlelight, holiday greens, mini poinsettia), Glossy Accents, butterscotch alcohol ink, pearls (flower centers)

Hope your Christmas is merry and bright!

Monday, November 3, 2014

Halloween thank you

Our street is devoid of children except for the 7 month old across the street.  Our community sponsors quite a few Halloween gatherings for the trick-or-treaters so we don't bother to turn our porch light on any more.  Besides, it was extremely windy and the temperature was in the low 30s...not exactly the weather the little ones like because they had to wear coats over their costumes.  Despite all this, we received a treat!  The mom of the 7 month old brought us a bag of homemade snack mix and had left it between the doors.  We have to say 'thank you!' in the way we do it best...with paper and dies!

outside

inside


Black/white card stock; core'dinations Adirondack card stock; Sizzix dies: mini cat/spider, Alphanumeric Thinlits, Pumpkin Jack, Jack-O-Lantern face, Card-horizontal A2 base, 3D Label insert and  Halloween Background/Swirls embossing folders

I did have to finagle the orange card stock on the pumpkin die and cut it smaller so it would fit inside the card. 

Hope you had a great Halloween!

Sunday, September 21, 2014

Altered Playing Cards - week 3

I really let my mojo take over today.  I had jotted down all the items Claudine used but really didn't remember looking at her samples.  I prefer to do that after I've created my own.  This week you'll see I've reversed hers!  Happy accident!


Gesso; alcohol inks (Rust, Butterscotch, Meadow, Latte), distress inks (Mustard Seed, Spiced Marmalade, Vintage Photo), Potting Soil/Jet Black Archival Ink; Measured Layering Stencil; core'dinations card stock scraps; Hero Arts sentiment (L); Botanical Remnant Rubs; Elmers Copper Leafing Pen; miscellaneous Sizzix letters; Lasting Impressions with Panache sentiment (R); Sakura White Jelly Roll pen; Black Sharpie

So, wanna play along?

Sunday, September 7, 2014

Halloween sights

Halloween is just 8 weeks away!  And it falls smack dab in the middle of my favorite time of year...FALL!  Love the colors, sights and sounds...reds, oranges, yellows all touched by a bit of brown....mounds of leaves recently raked, mums and pumpkins by the front door...the crackling leaves as you scuffle through them, nuts falling from the trees, the cheers from the football fans....ah, I love FALL!!!

I've created this Halloween piece to fulfill the requirements by 2 month-long fall-themed challenges.  The first is by Die-namites Dies and the second is for eclectic Paperie.  Both are offering $25 gift certificates to their stores.  DD requires that you use at least one of their dies in your piece, use their sketch; there's an additional challenge to incorporate the dare.

Without further ado....
Overall size:  8.5" x 8.5"

Die-namites dies:  Leafy Branch DN-1046, Knobby Branch DN-1048, Summer Branch DN-1056
Canvas Corp.: Black & Ivory Ribbon Strip cardstock, Spooky Word on Ivory cardstock
Martha Stewart: fence, dripping blood border punches
Ranger: Glossy Accents, Black Soot Distress Glitter, Spiced Marmalade Distress Crackle Paint, Spiced Marmalade Distress Stickles, distress inks & stains, Biscotti Perfect Pearls Mist, Jet Black Archival Ink
Sizzix:  mini movers & shapers spider, arch frame, Pattern & Stitches border embossing folder
Stampers Anonymous:  Apothecary stamp set CMS138, layering stencils (Halloween, shatter)
Core'dinations: Black Magic color core cardstock
Misc.: buttons, silk ribbon,

I love the look of layering the three Die-namites into very dimensional fall trees.  With the middle layer using core'dinations color core (orange with black surface) there's an added layer of color when the edges have been sanded.

Pewter Distress stain coated the back of the shatter layering stencil then placed it around the edges of the black base.  The image left behind is a bit shimmery but not shiny had I used silver distress paint.

Hope you get your fall colors on soon!