I wasn't going to fall in love with Tim Holtz's village dwelling. I wasn't. Too much money for me, I said. Too limited in creativity, I said. Boy, was I ever wrong! I'll show you what I mean.
 |
| Brick house |
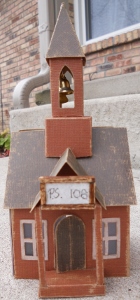 |
| School |
 |
| Winter house |
 |
| House of worship |
|
|
|
|
|
|
|
|
|
|
I've tried to list everything I used but I didn't keep track of the colors of anything...I just kept grabbing and playing until I was satisfied.
Dies: Village Dwelling, Village Bell Tower, Village Winter, Brick Wall, Cobblestone, cross
Ranger: alcohol inks, archival inks, distress inks, distress paints, distress stains, distress markers, watercolor distress paper, Distress Stickles Clear Rock Candy Dry Glitter, Texture Paste
Extras: Frosted, Studio 490 Embossing Paste, clear packaging, mica, 110# cardstock, Kraft Core, Adirondack Core, bells, mini fasteners, wood toothpicks, shrink plastic, graphite pencil, Burlap Texture Fade
Brick house: IRL the door isn't quite that yellow. The lines were made with distress paint smeared on my craft sheet and a square wood toothpick placed in it then on the door to create the pattern. Mini fastener = doorknob. I created a stencil using the Brick Wall die and smeared embossing paste through it. Let dry then added color. The house was first painted with Hickory Smoke distress paint to simulate the mortar. The front stoop was painted with HS dp then splattered with Black Soot d. stain (love that spatter brush!) to look like marble. Mica is behind each window. Wood toothpicks are the pillars.
School: wood toothpicks around white sign. Hand-wrote the name of the school.
House of worship: shrink plastic and mini movers & shapers cross for the front door. Used the Cobblestone die to create a stencil and smeared various d. inks through the stencil. Randomly drew around some of the stones with the graphite pencil. Upon completion I smeared a light brown d. ink all over the pieces (before construction!) to smudge the look. The roof shingles were drawn with the graphite pencil then smudged with my fingertip. Alcohol ink on clear packaging is behind the windows.
Winter house: Frosted behind the windows; Frosted for the snow and icicles - covered all with MultiMedium then sprinkled DS Clear Rock Candy dry glitter over all (did this post-construction). Added Texture Paste and DSCRCDG to windows and stoop. Mini fastener for door knob.
I still have plenty of ideas in my head and know that with the release of more dies next year I won't get bored creating a village...or two. Maybe I'll make one for each season...time will tell!

 Sizzix
mini cardinal, Birch Trees; Stampers Anonymous Simple Sayings CMS156;
Ranger Jet Black, Vermillion Archival Inks, Adirondack Stonewashed Ink,
Diamond Stickles; Bazzill cardstocks (white, red, blue)
Sizzix
mini cardinal, Birch Trees; Stampers Anonymous Simple Sayings CMS156;
Ranger Jet Black, Vermillion Archival Inks, Adirondack Stonewashed Ink,
Diamond Stickles; Bazzill cardstocks (white, red, blue) A very mini village dwelling made from shrink plastic!


