Thursday, April 29, 2010

What's inside?


Here's what was inside my Earth Day celebration wrapped box. This is my sister's Mother's Day present. They're moving tomorrow and I didn't want it to get lost in transit.

Something from Wendy, something from Tim, buttons, a little bit of everything all rolled into one much-loved gift by my sis. The 'S' I made by running one of Tim's stencil alphabet through my die-cutting machine. There is smudged ink (Ranger) to raise the 'S' off the page (actually it debosses, not embosses, the 's'). Hope you enjoy it as much as my sis!

Monday, April 26, 2010

Earth Day - celebrate it every day


I do my best to reduce my carbon footprint, reuse what's on hand, and recycle as much as possible. This package has it all! The box was destined to be recycled, the wrapping paper was plain and used as filler in another box. After fixing celery sticks over the weekend I saw the green 'flower' and had to ink (several colors from Ranger's pigment line) it up immediately. The images aren't spread out evenly, oh well. The 'ribbon' was a strip cut from a produce bag, the tag was also from a produce bag.

It's never too late to celebrate!

Friday, April 23, 2010

Art begins with a vision


And I definitely do not have 20-20 vision (never have)! LOL In fact, a cataract has appeared in my left eye so at some point (I hope in the very distant future) I'll have to have it removed. For now, I'll just deal with my less than perfect vision.

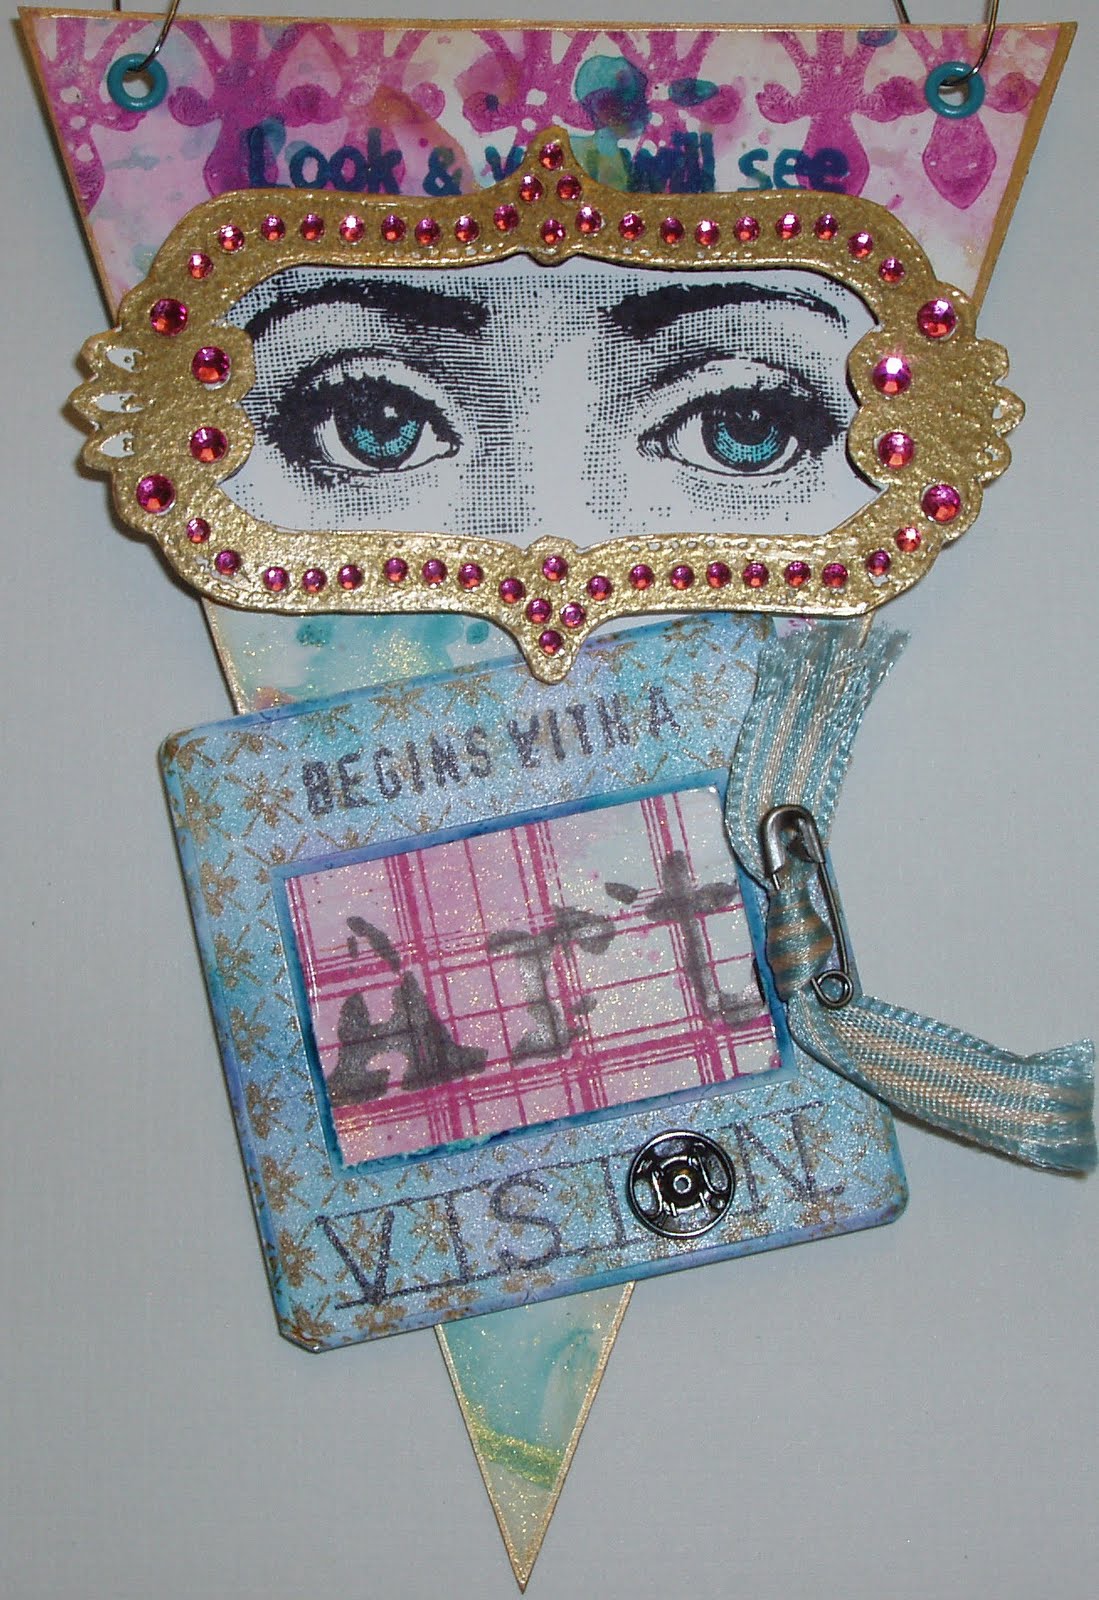
The base piece for this (last) mini banner was polished stone and edged with the gold paint dabber. A border stamp is across the top (maybe in wild plum). I only used part of the sentiment (blue).

The plastic slide got the same treatment with alcohol inks. It's been overstamped with one of Wendy's background stamps (little flowers with x's through them is the easiest way to describe it). The sentiment was carefully stamped on the slide with the help of a stamp positioner.
Art
was stamped on a leftover piece from the base banner then Wendy's plaid background.

Yes, the frame was gold heat-embossed with lots of tiny pink jewels attached. I cut out the center so I could elevate it over the face. The irises were colored with a brush and one of the blue distress inks.

To finish it off, a snap for the letter
O
in vision, and Tim's tiny safety pin was run through a striped ribbon that's been distressed before it was glued down.

Ta da! My collection for trading is complete! They're not due until 5/25 so I have to wait a while to see what I'll get in return. This was a fun art challenge; I'm so glad Debby came up with the idea.

Thursday, April 22, 2010

Find your style


This manner banner is full of sewing-related things. I'm so glad Wendy came up with this set; sewing is very big part of my background. My grandparents took in alterations for the public and we all, including my brother, learned to sew at an early age. Even my grandfather hemmed pants. Needless to say we wore handmade garments for a long time (thank you,mom!). Now I'm not sure how cost-effective it is to make your own garments. I remember walking down the street and seeing someone wearing a blouse. I commented on it because I had just purchased the fabric for myself. She bought hers already made in a local store. Grrrrr....

There are old pattern pieces, twill tape, buttons, etc. on this banner. The garment was stamped on muslin with archival ink; it was colored with one of the distress reds. The thimble and spool are actually buttons but I removed the shanks. I did wrap thread around the spool for more authenticity. The scissors came from a drawer...other than that I have no clue! LOL

Thanks, Wendy, for bringing back so many happy memories of my childhood!

Monday, April 19, 2010

Shopping


I shopped enough last weekend after Wendy's classes that I'm set for awhile now. Don't *NEED* a thing! Famous last words that come out of every artist's mouth at some point. LOL

Two stamps create the background...the zig zag stitch looks perfect going up the one side - just fit! The paper fasteners label was stamped on grungepaper and distressed. I add a tiny fastener on top of the one on the label. The flower buttons had shanks on them. Before cutting them off I used them to stamp the button onto an inked stamp. A few more buttons, some twine, a die cut or two and I was happy.

Sunday, April 18, 2010

By the numbers


Drats! I didn't write down all the things I used when making my mini banners and now I'm having to guess what I did and how. Sigh.

I used several background and border stamps in several colors to make the layers all pop. The bingo strip is only a portion from the larger image. The hand was stamped on grungepaper. Not sure if the tag is the sample from the package exterior or something else. I believe there's a fragment piece on the small #2 (near the top edge). The small clock face is metal-don't know where it came from. The 8 is Tim's chipboard using a morphed version of the Drunken Scotch tech on it. A fellow ATT member showed the DS tech but I use this one just as much, if not more. All inks by Ranger (who else?).

Saturday, April 17, 2010

Home is best


This is the 2nd mini banner in the set of 6. The banner is coated cardstock so I took the dots background and did a resist before overstamping the tree in black. The heart is grungepaper as is the house and door (elevated with a scrap of grungepaper). The home plaque was stamped on cardstock and aged. I cut up square tooth picks, distressed them then framed the sentiment. The heart on the peak of the house is from Maya Road, was stamped then added Glossy Accents for dimension. The large rickrack trim is held on with Tim's tiny staples. This banner was inspired by some of Wendy's work from her books.

Friday, April 16, 2010

Birdland


In the EverythingWendyVecchi yahoo group we're making mini banners to swap. They're 3.5" wide by 5" long. For this one I stamped the bird on grungepaper with sepia ink and edged the bird's belly in blue. Ditto for the wing. The sentiment was stamped on cardstock then cut out; edged with one of the brown distress inks; elevated with a snippet of grungepaper. The background was createdby inking up my craft sheet with denim blue and butterscotch inks then oversprayed with one of the gold Perfect Pearls & water in a mini mister. To reinforce the banner for hanging I used color coordinated eyelets.

Wednesday, April 14, 2010

Welcome to my (altered) nest!


Have had major computer issues since last night...thank goodness hubby was able to get me back up and running again. We will be shopping for a new laptop so hopefully I can keep this one going until then.

This was the 2nd Wendy class Saturday in Bloomington, IL. Lots of Wendy stamps, distress inks, grunge paper, snaps, game spinners, new Idea-ology memo pins, and alterations dies. I tapped my archival black pad all over the metal bird cage to give it some age. The black dots on the memory frame were made with a Sakura black glaze pen. How cool is that?!?!?

I think it's time I got my own nest looking this good! LOL

Tuesday, April 13, 2010

Perfectly Practical Pocket Journal


What fun! Not one but 2! classes with Wendy Vecchi and friends Saturday!!! First we made this really cool journal. The cover and external embellishments are all made from grungepaper so you can toss this in your bag, tote, etc. and not have to worry about it. With the rings you can easily remove/add pages as you see fit. The inside covers are decorated as well as the external back cover but mine aren't as nice as I'd like for them to be so you won't be seeing those. Maybe one day when I'm desperate to share some art....lol!

We used lots of Wendy's new images as well as Tim's alterations. Of course we used lots of distress inks, especially the new colors. The journal edges were outlined with the gold paint dabber for that final bit of pop at the end.

Tomorrow I'll share the wall hanging birdcage we altered. Another great gift idea!

Friday, April 9, 2010

Where do I sit?


I'm so psyched because I get to take 2 more Wendy Vecchi classes tomorrow with Lori and Debby!!! We're making a 'perfectly practical pocket journal' out of grunge materials and then an 'altered nest' where we'll alter a wall hanging birdcage. I plan to get to the store early so I can choose our seats then shop before class and finish up afterwards. I envision a full & heavy shopping bag but I can't afford it. Sigh. I'll just have to figure out what I *have* to get now and what can wait.

All stamps are Wendy's...of course! The bottle & lid were stamped on acetate with StazOn, all other inks are Ranger. I used a small fragment piece over 'contents'. The back & cap of the bottle were colored with alcohol inks. I have a tiny tag punch for my initial (Hero Arts stamp).

Monday, April 5, 2010

Purs-onally yours


Here's a chipboard purse I made recently for one of my EWV friend's birthday. The chipboard purse was from Michaels and actually one of 5 pages. The chipboard heart, buckle and label came in a package from JoAnn's. I created the faux leather strap out of grungepaper, distress ink and crackle medium. The chipboard buckle also has distress ink and crackle medium used on it. Stamps are all Wendy's; the spinner is Tim's. All inks by Ranger. The base paper is actually from a 6"x6" pad (came with the neat handwriting on it!) that fit the purse perfectly - not much cutting out to do. A bit of distressing ink around the edges finished off the purse. This piece makes me want to go shopping so I can make more art!

Sunday, April 4, 2010

Easter chick


Yesterday I hid eggs in the neighbors' house...unbeknownst to them. Can't wait to see how long it takes for them to find the 7 strategically placed eggs. All in plain sight, but easy to miss if you aren't looking for them. Not being mean...just fun loving.

So, how about that Easter chick? All stamps are Wendy Vecchi's except for the tiny dragonfly (Hero Arts). The grass is a crown punch (cut off the round tips) by Martha Stewart, the bunny ears are also MS. Don't know the manufacturer of the egg and carrot. All ink by Ranger.

Happy Easter!